Diving into RPC – Exploring a Deeper Layer of Detection
Introduction
In this article, we explore the defensive capabilities of Microsoft RPC (MSRPC) and introduce a powerful tool called RPCFirewall. While many discussions focus on identifying vulnerabilities within MSRPC, we will examine how to use RPCFirewall to detect and mitigate malicious activities that exploit this protocol.
MSRPC is a critical component of the Windows operating system, enabling various functionalities and communications. Due to its extensive use, numerous lateral movement techniques leverage MSRPC, including attacks like PSExec, Remote Scheduled Task, DCSync… Differentiating between legitimate and malicious MSRPC traffic can be challenging when relying solely on traditional network metadata like IP addresses and ports.
Remote Procedure Call (RPC) is a protocol for interprocess communication (IPC) that allows a program to execute a procedure on a remote server as if it were local. In Windows, MSRPC is Microsoft’s implementation of this protocol, following a client-server model. The server defines the interface it exposes using the Interface Definition Language (IDL), which includes a unique universal identifier (UUID) and the definitions of the functions available for remote invocation.
When discussing RPC, it is important to recognize that there are various way of interaction available. Examples include RPC over TCP/IP (ncacn_ip_tcp) and RPC over named pipes (ncacn_np). Detailed information on these protocols can be found at the following link: MS-RPCE Protocols.:MS-RPCE Protocols
RPC FILTER & RPC FIREWALL, make the difference
1. Is rpc filter sustainable?
Windows offers the ability to filter RPC calls through its firewall, allowing you to permit or block incoming RPC calls while auditing them. You can achieve this with the following commands, for example:
rpc
filter
add rule layer=um actiontype=block
add condition field=if_uuid matchtype=equal data=c681d488-d850-11d0-8c52-00c04fd90f7e
quit
Each time these rules are triggered, windows is supposed to generate the EventCode 5712.
EventCode 5712 Official documentation
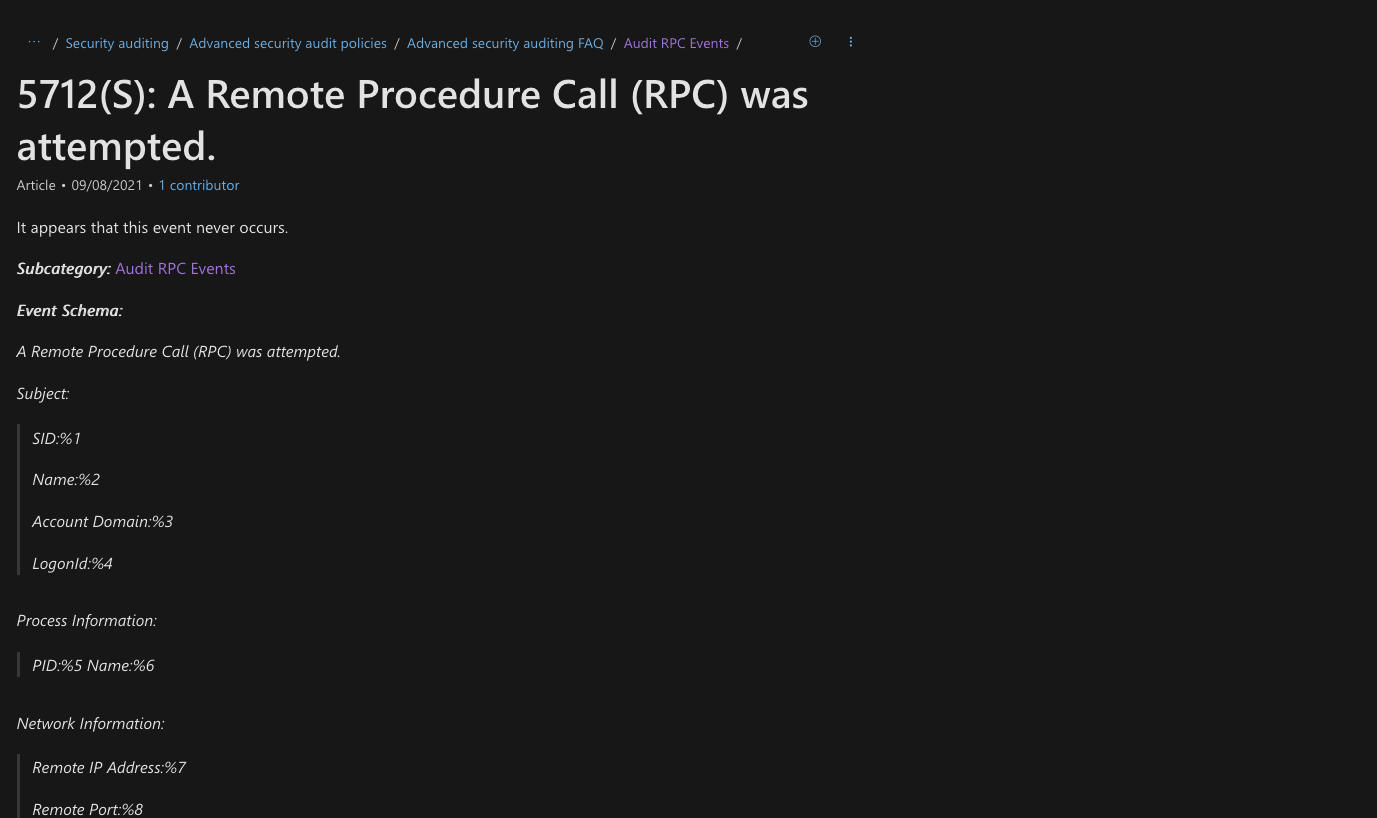
However the big point is this log is inconsistent. It lacks of information and it’s not generated each time.
2. The capabilities of RPC Firewall
That’s where RPCFirewall from Zero Networks comes in. The project aims to improve the logging of RPC Audit and ETW, creating a more informative logging journal in Windows. They have an excellent article explaining their solution, available at the following link: Stopping lateral movement with RPC Firewall and you can find the GitHub project here: Zeronetwork github
With RPCFirewall, you can easily create a configuration file and choose to allow, block, and audit based on interface_uuid, op_num, or src_ip. The parameters you can use are:
- fw: Applies the RPCFirewall configuration and logs in the RPCFW journal.
- flt: Uses the RPC Filters.
In our case, we mainly performed our tests with the fw option, with action allow and audit enabled. However, Microsoft introduced a technology called « Protected process Light », and for these protected process, we can only use the flt option as the RPCFW dll can’t inject into it. So we could still use the EventCode 5712
That’s why we prepared to ingest everything into Splunk for testing. But first, we need to find a way to identify all the functions associated with an RPC interface_uuid and op_num.
How to retrieve RPC Interfaces?
To retrieve all the information about RPC interfaces, I personally use the script from enigma0x3 which I modified slightly to generate a CSV.
To use the following DLL: C:\Program Files (x86)\Windows Kits\10\Debuggers\x64\dbghelp.dll, you will need to install the Windows SDK debugger
$rpc = ls C:\Windows\System32\*.exe, C:\Windows\System32\*.dll | Get-RpcServer -DbgHelpPath "C:\Program Files (x86)\Windows Kits\10\Debuggers\x64\dbghelp.dll"

$results = @()

foreach ($rpc1 in $rpc) {
    # Write-Host $rpc1  # You can uncomment this for debugging if needed.
    foreach ($proc in $rpc1.Procedures) {
        $ourObject = New-Object -TypeName psobject
        $ourObject | Add-Member -MemberType NoteProperty -Name InterfaceID -Value $rpc1.InterfaceID
        $ourObject | Add-Member -MemberType NoteProperty -Name FileName -Value $rpc1.Name
        $ourObject | Add-Member -MemberType NoteProperty -Name ProcedureName -Value $proc.Name
        $ourObject | Add-Member -MemberType NoteProperty -Name ProcedureNumber -Value $proc.ProcNum
        $results += $ourObject
    }
}

# Now export $results to CSV
$results | Export-Csv -Path "C:\Users\Administrator\Documents\rpc.csv" -NoTypeInformation
Now we can have the lookup that determine the Procedure Name(the function) and the file name depending on the UUID_Interface and the Procedure_Number (opnum)
A bit of Splunk Configuration
Let’s prepare the splunk configuration with the RPCFW logs. Firstly we add the following configuration on our DC (LAB-DC) :
[WinEventLog://RPCFW]
checkpointInterval = 5
current_only = 0
disabled = 0
index = windows
renderXml = true
start_from = oldest
Then we prepare the transforms.conf on the application on the Search Head cluster Deployer to push on the Search Head Cluster :
XmlWinEventLog:RPCFW]
EXTRACT-event_details = <EventID Qualifiers='\d+'>\s*(?<event_id>\d+)\s*</EventID>.*<TimeCreated SystemTime='(?<system_time>[^']+)'/>.*<EventRecordID>(?<record_id>\d+)</EventRecordID>.*<Execution ProcessID='(?<process_id>\d+)' ThreadID='(?<thread_id>\d+)'/>.*<Computer>(?<computer>[^<]+)</Computer>
EXTRACT-user_activity = <Data>(?<activity>[^<]+)</Data><Data>\d+</Data><Data>(?<path>[^<]+)</Data><Data>(?<protocol>[^<]+)</Data><Data>(?<source_port>[^<]+)</Data><Data>(?<src>[^<]+)</Data><Data>(?<interface_uuid>[^<]+)</Data><Data>(?<procedure_number>\d+)</Data><Data>(?<user>[^<]+)</Data><Data>(?<privacy>[^<]+)</Data><Data>(?<auth_type>[^<]+)</Data><Data>\d+</Data><Data>(?<destination_ip>[^<]+)</Data><Data>(?<destination_port>\d+)</Data><Data>(?<sid>[^<]+)</Data>
LOOKUP-interface = interface-lookup interface_uuid AS interface_uuid procedure_number AS procedure_number OUTPUTNEW file_name, procedure_name
````

And then the props.conf :
```conf
[interface-lookup]
filename = rpc_procedures.csv
external_type = file
fields_list = interface_uuid, file_name, procedure_number, procedure_name
Analysing of some attackers tools.
If you’re working in cybersecurity, you know that detecting malicious behavior can sometimes be a challenging task. Microsoft interactions are really complex, and even though EDR/NDR solutions are improving, they can still miss some behaviors. In Windows, many of these interactions are based on RPC, which is also used by attacker tools. In this section, we will use many various famous attacker tools and analyze their behavior
We will execute various lateral movement, reconnaissance, or credential harvesting payloads from different tools such as Impacket , Sysinternals, Ghostpack, Mimikatz , and analyze them using both Wireshark and Splunk. For Wireshark, we can apply the following filter to specifically view the RPC calls and the interface_uuid:
dcerpc and ip.src == 172.16.16.22 and dcerpc.cn_bind_to_uuid
1. Impacket Atexec.py
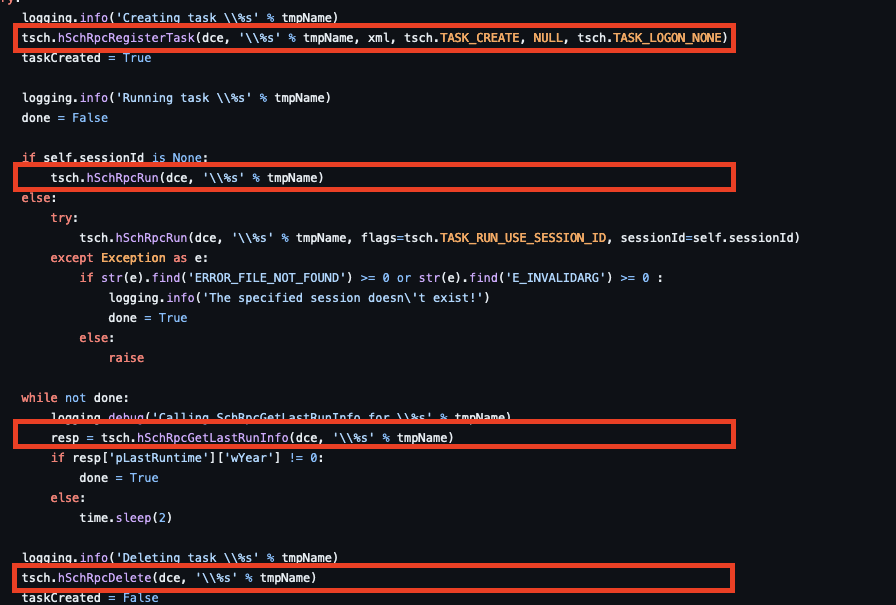
We can start our analysis with a first tool from impacket : atexec.py. Atexec.py permits to eecute remote tasks scheduler through the task Scheduler.
First, Let’s analyze some part of the python code:
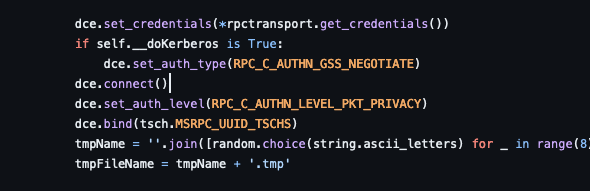
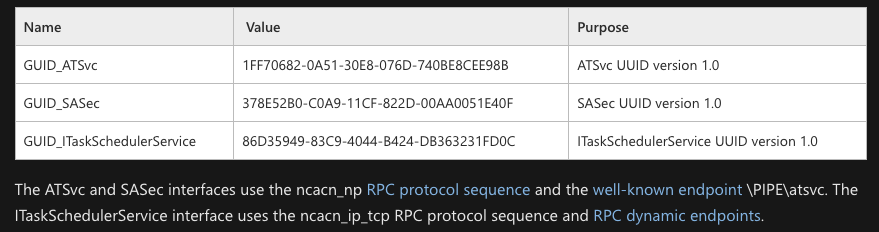
On this function, we see the dce.bind function on the MSRPC_UUID_TSCHS Interface. If we look on the Microsoft documentation about TSCHS (MS-TSCH), we find the following interfaces :
Now if we look back to the code deeper, we can see the following functions executed :
So what are we expecting from these? If we’re using TCP, we expect to see a GUID of 86D35949-83C9-4044-B424-DB363231FD0C with the functions :
– SchRegisterTask – SchRpcRun – SchGetLastRunInfo – SchRpcDelete
Let’s have fun and play with wireshark and Splunk.
Wireshark analysis - TaskScheduler
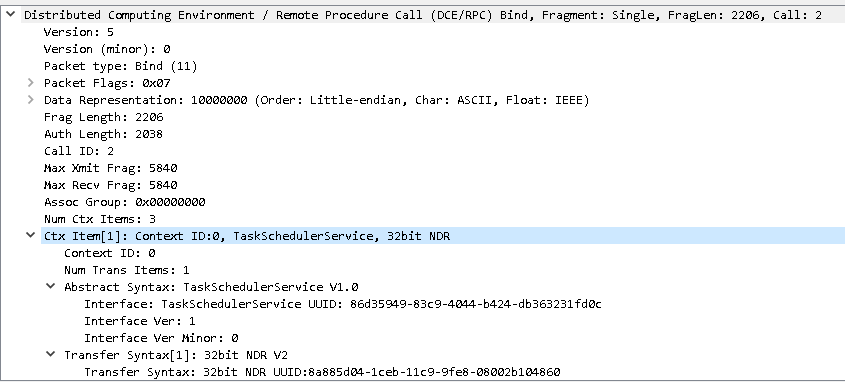
We got right on the interface. After executing the payload we can effectively see the corresponding_uuid.
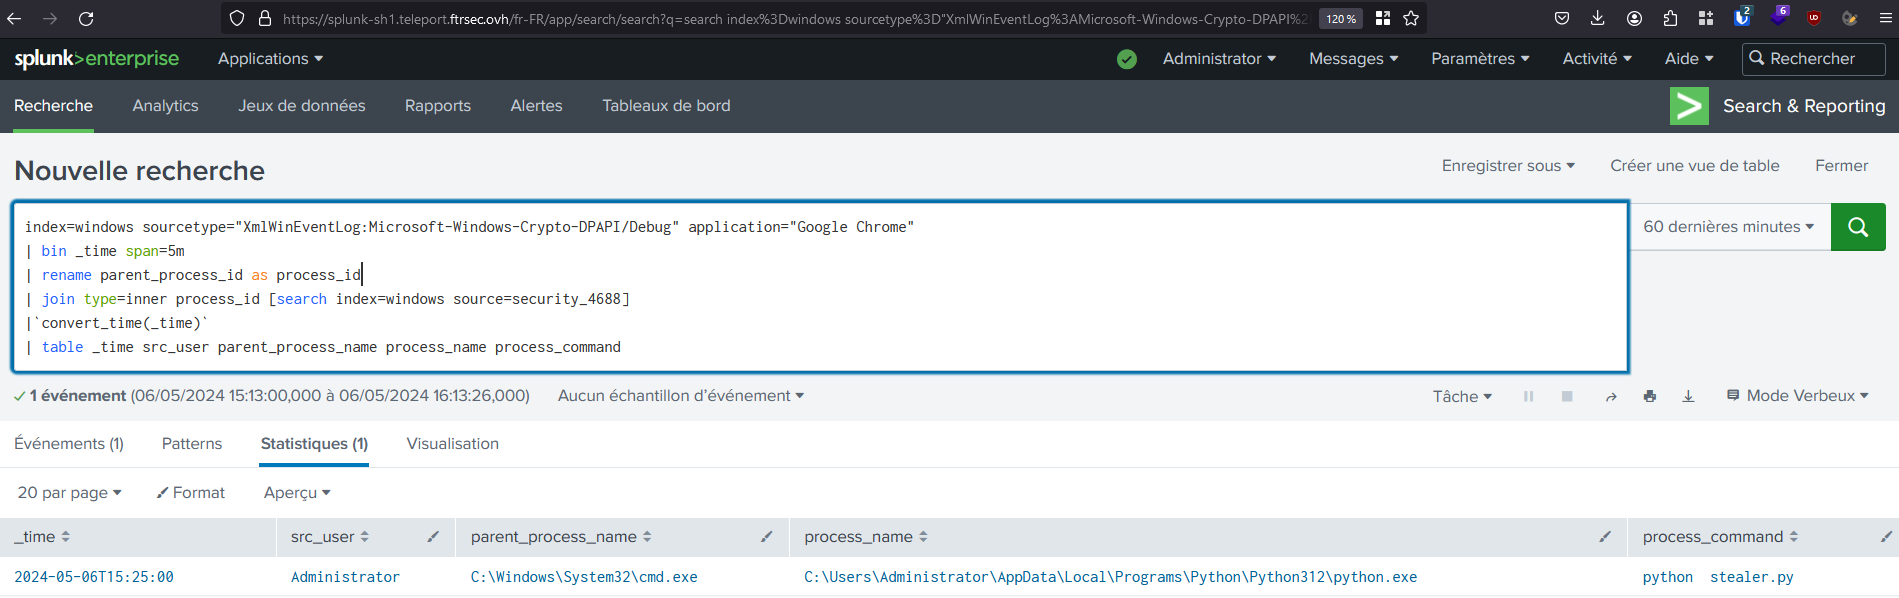
Let’s see what we have on splunk :
Splunk analysis - TaskScheduler
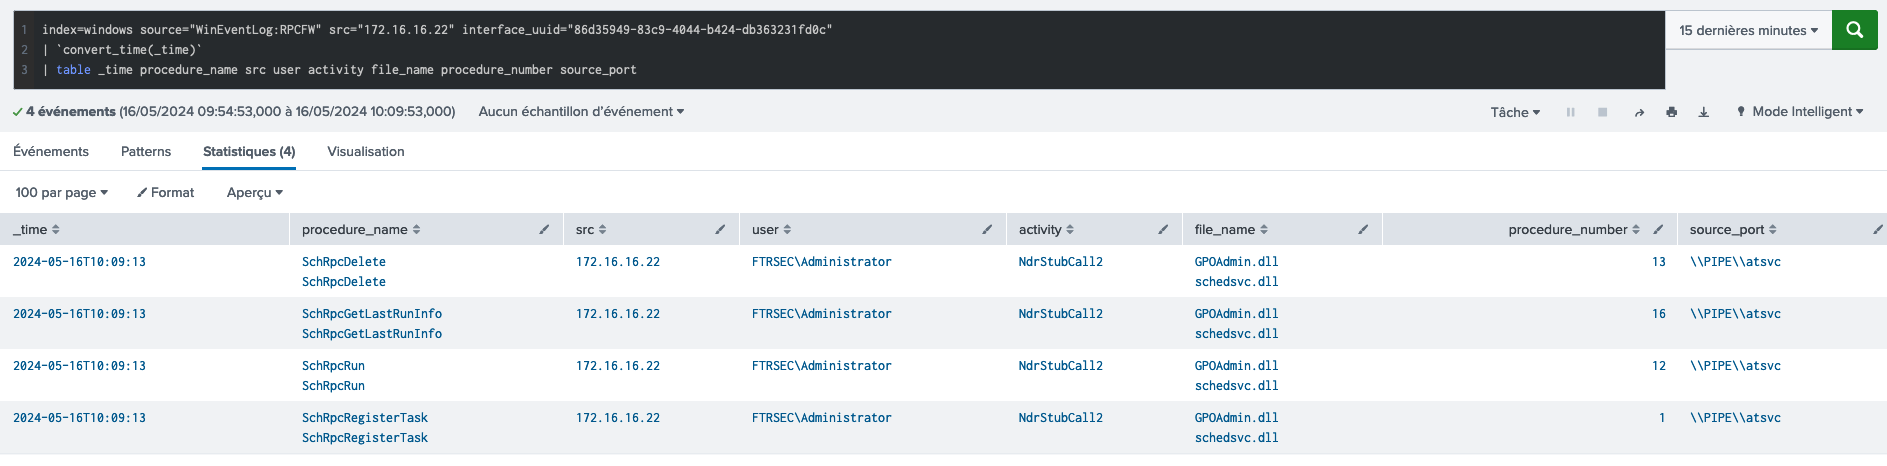
Bingo ! We got exactly the expected behavior and were able to detect fully the atexec.py in the second it was launched !!
Let’s see some other example with splunk following the same procedures :
2. Impacket LookupSids.py
LookupSids - Splunk

3. Net view from powershell
Net view - Splunk

4. Impacket dcomexec.py
Dcomexec - Splunk

5. Impacket secretsdump.py
Secretsdump - Splunk
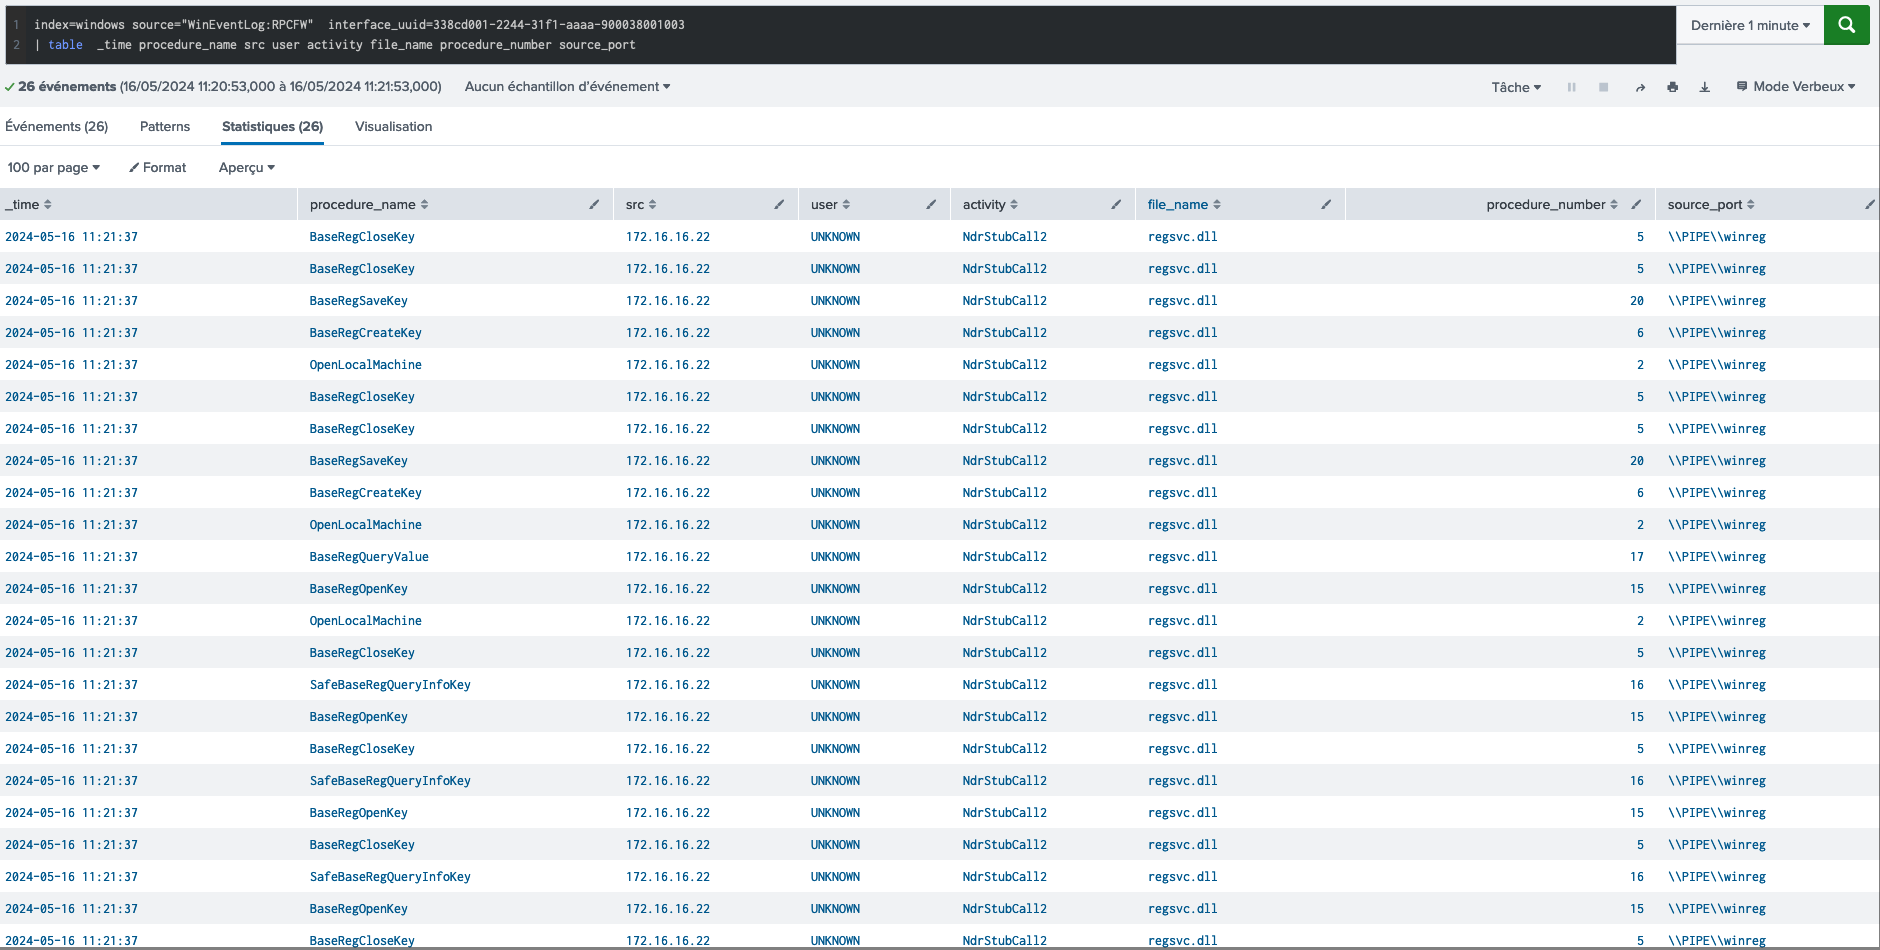
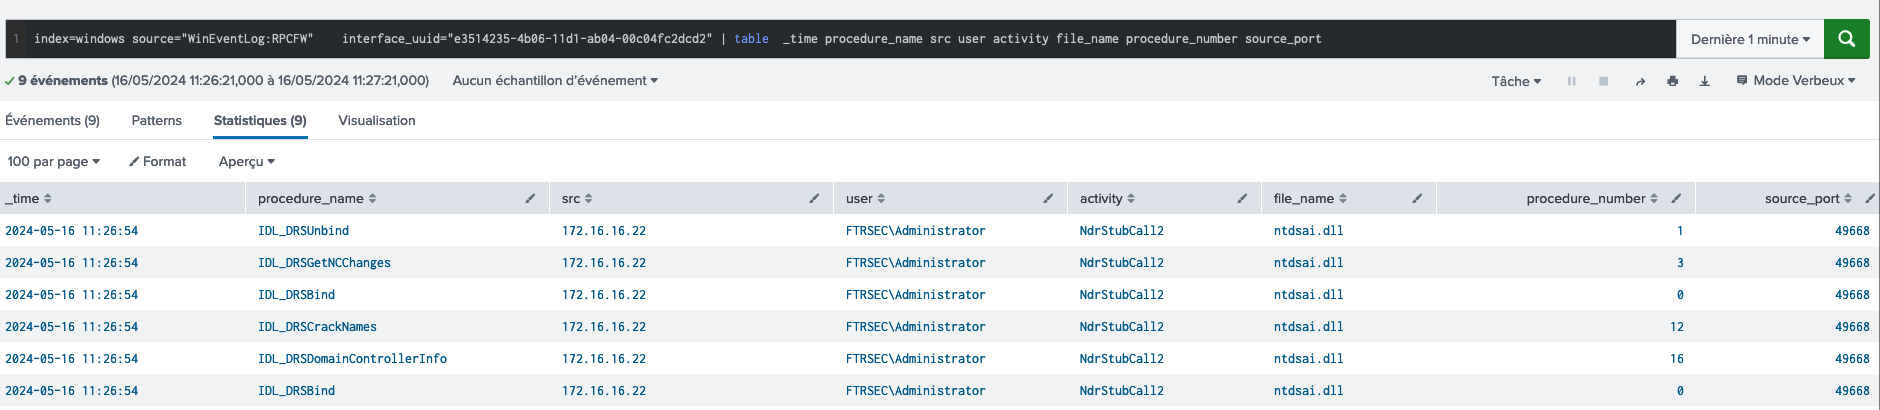
6. DCSync with Mimikatz
DCSync - Wireshark
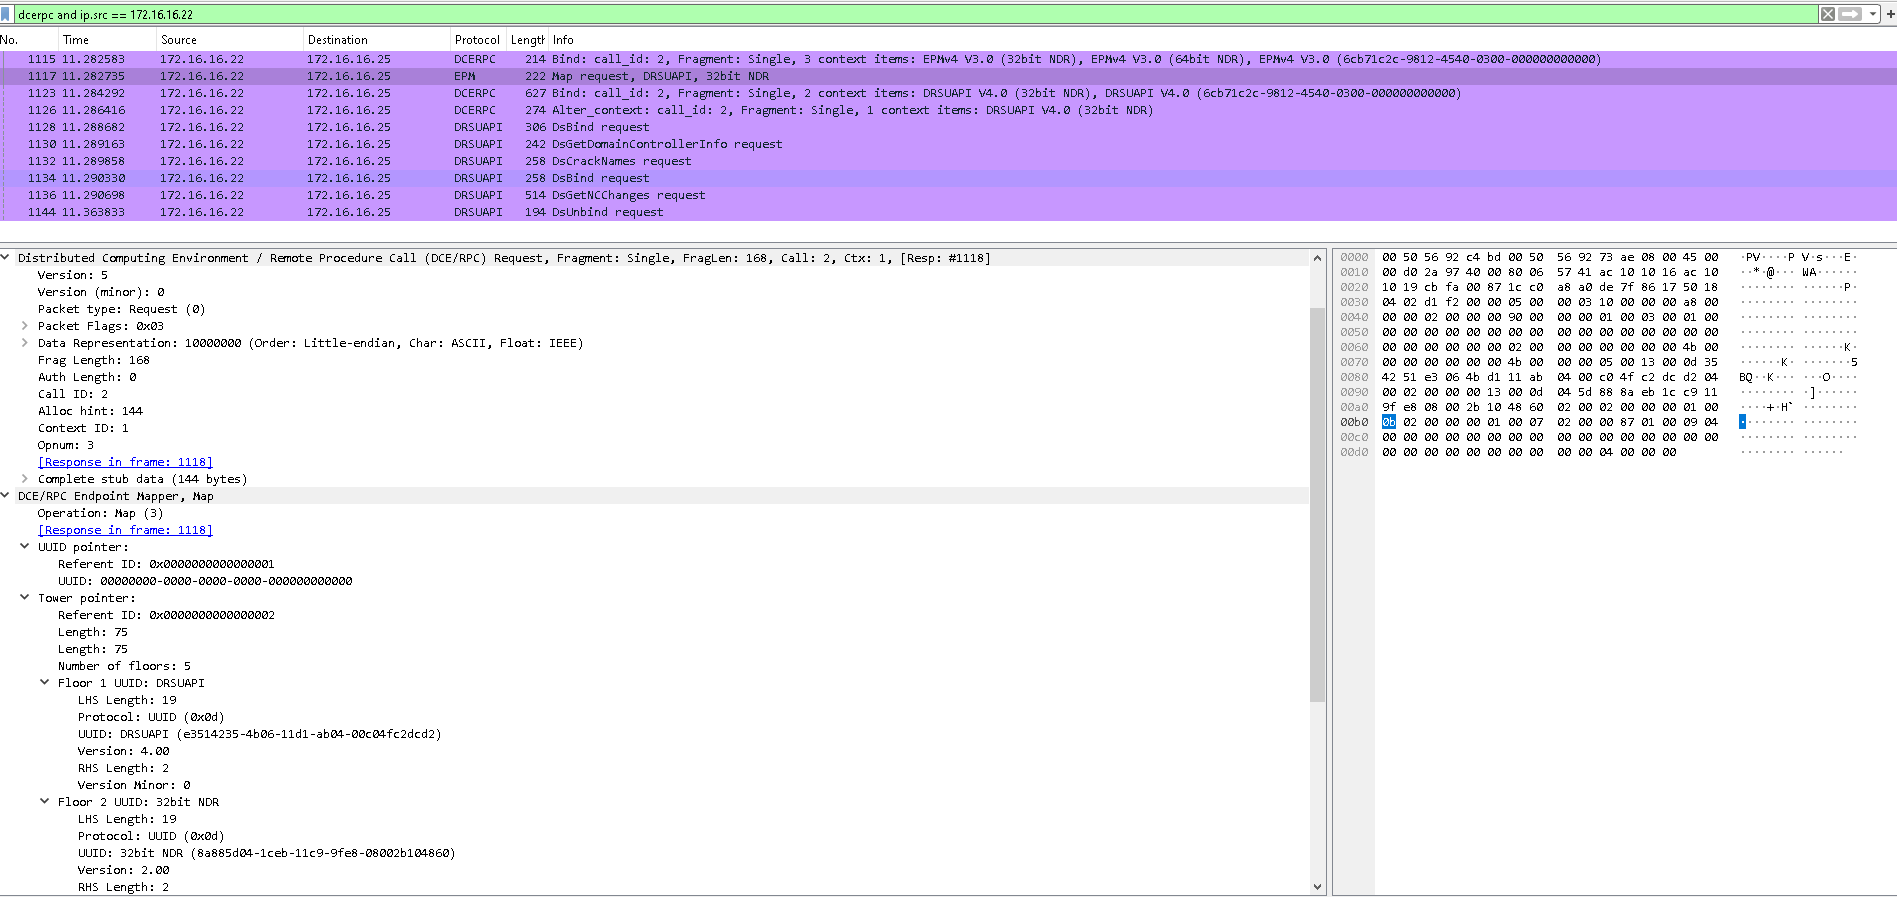
DCSync - Splunk
7. PSExec
Note
For psexec, we couldn’ see on the RPCFW journal because psexec work by starting the service psexesvc.exe on the remote destination. However, the service is protected, so we will detect using the EventCode 5712
Psexec - Wireshark
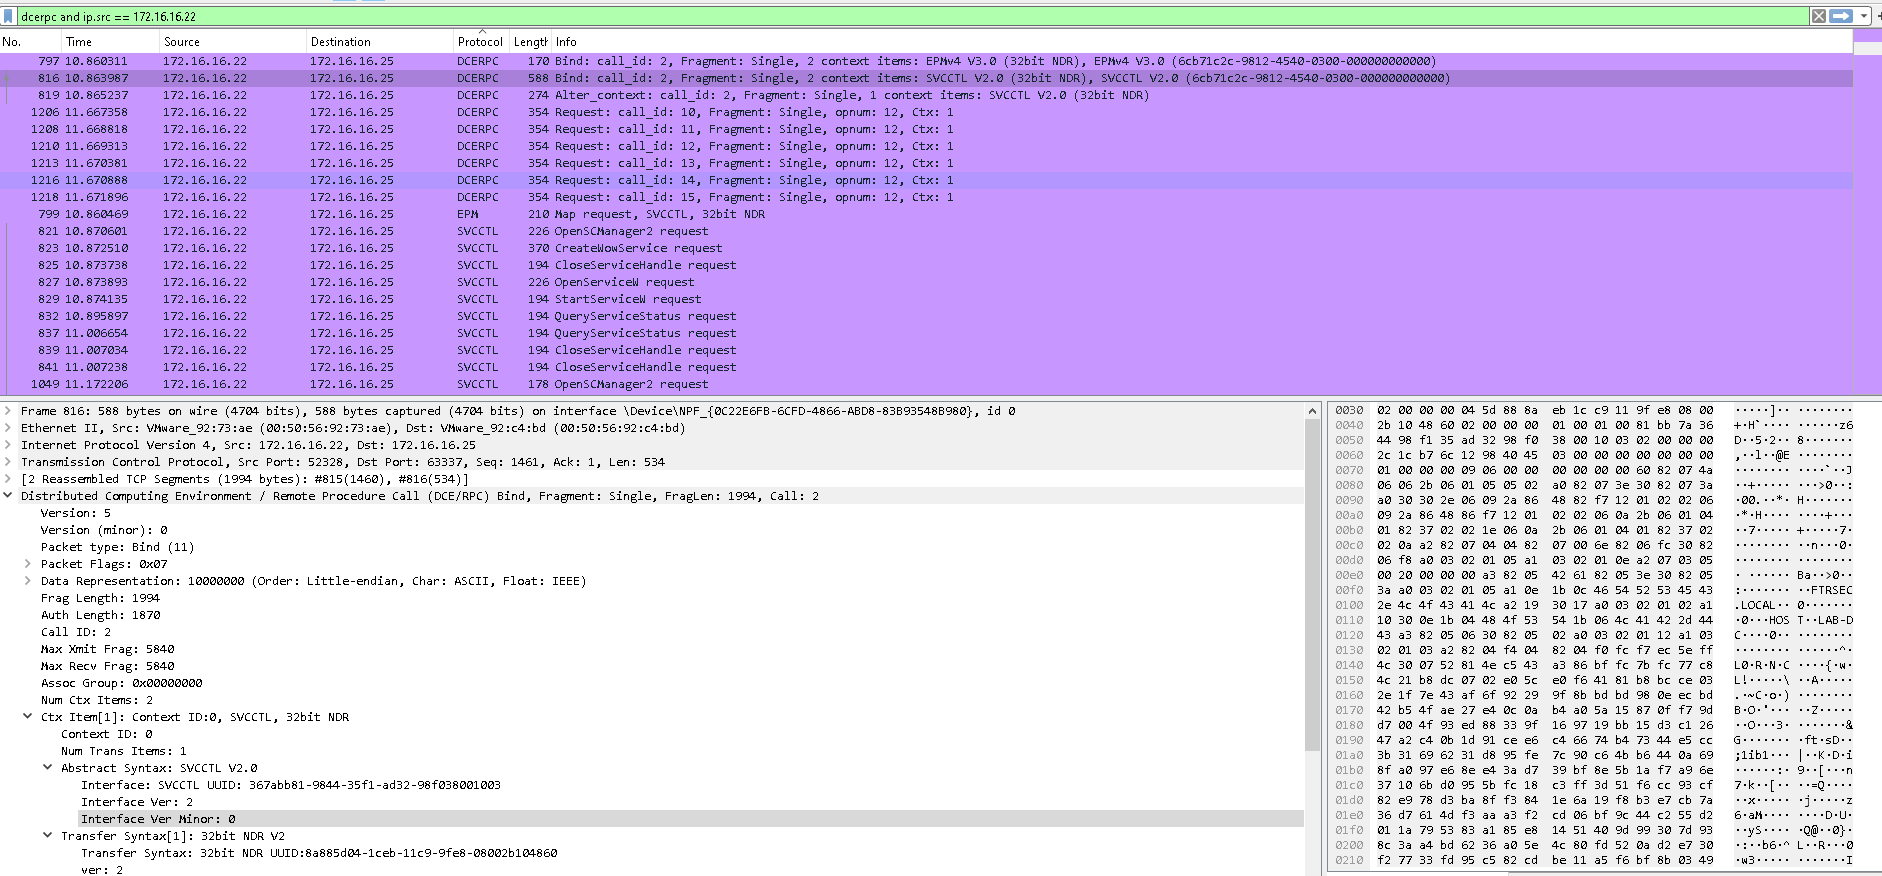
Psexec - Splunk
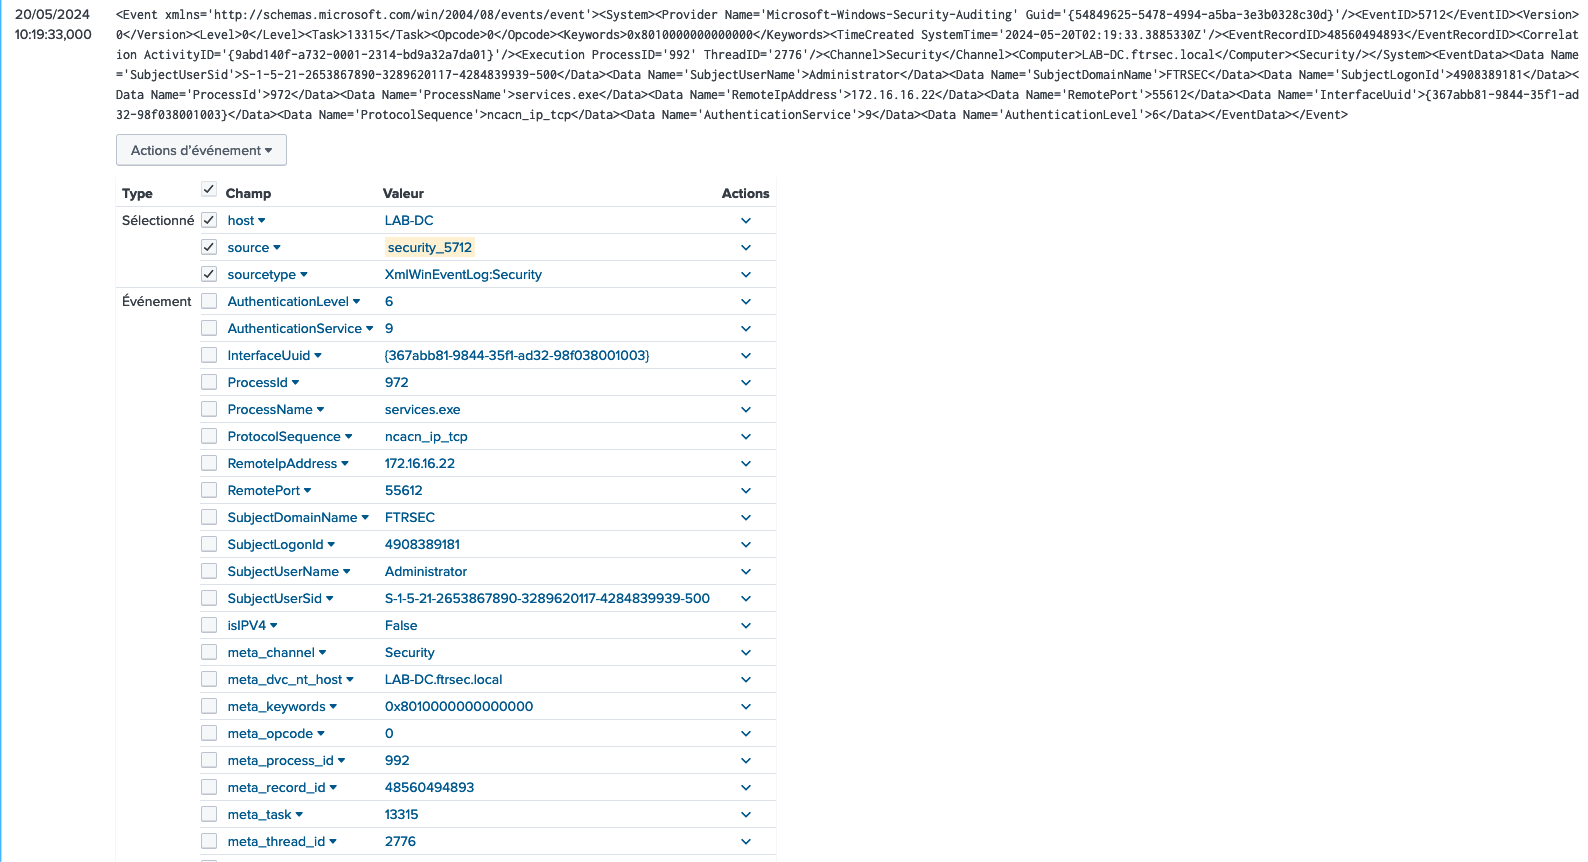
Now because we didn’t use the blocking functionality on this article, we will try to modify our configuration line to : flt:audit:true uuid:367abb81-9844-35f1-ad32-98f038001003 action:block.
And we can see it blocked perfectly our psexec !
Psexec - Blocked

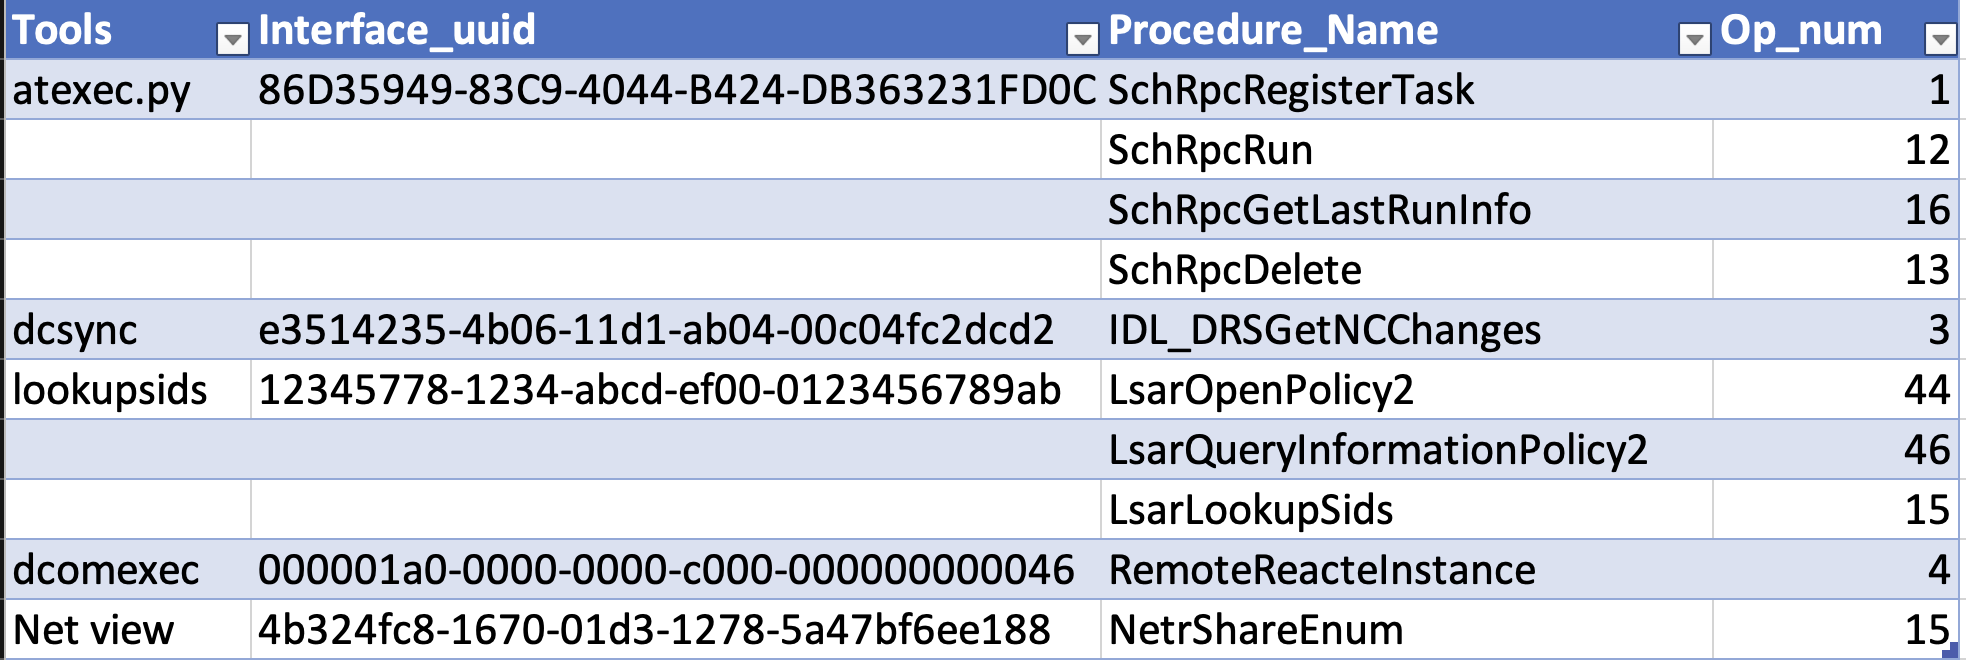
Recapitulative table of the attacks detected by RPC Firewall
Conclusion
To conclude, we were highly impressed by the RPC Firewall project by Zero Networks. It enabled us to detect advanced lateralization, reconnaissance, and credential dumping tools utilizing the RPC protocols more quickly and thoroughly than current EventCodes, when detection was possible.
In this article, we primarily focused on the detection aspect. However, as demonstrated with PsExec, the RPC Firewall also possesses effective blocking capabilities. Due to the protected process light, we still need to rely on the native Windows filtering, but only when necessary.
We recommend using both RPCFW and EventCode 5712 for improved detection coverage.
Next step will be to try their project LdapFirewall !
Happy RPC-Splunking!
REFERENCE
https://www.akamai.com/blog/security/guide-rpc-filter https://zeronetworks.com/blog/stopping-lateral-movement-via-the-rpc-firewall https://youtu.be/hz_YPIMeBMI